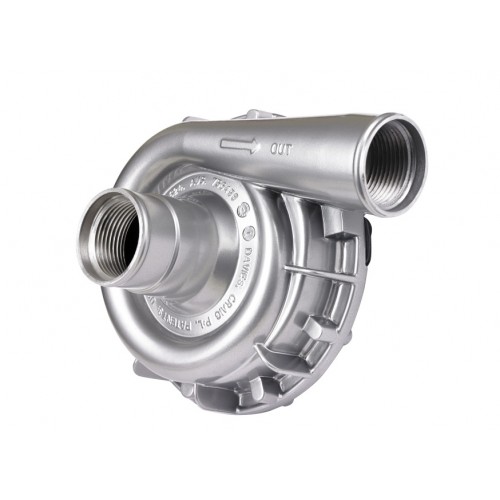
The EWP115 Electric Water Pump - univresal fit, do-it-yourself, easy to install water pump designed to replace or compliment your existing belt-driven mechanical water pump.
The EWP®115 Alloy (12V) is available for purchase in following options:
The EWP®115 pump is suitable for small, medium, large, high- performance and 4WD vehicles. It’s a performance product that improves engine cooling control and capacity whilst giving you more power and torque and improved fuel economy.
The EWP®115 is a practical alternative to the mechanical belt-driven pump or fitted as an auxiliary pump. Mechanical belt-driven water pumps run directly off the motor and sap engine power … the EWP®115 is hardwired into your electrical system, by-passing the engine and releasing up to an additional 10kw (13hp).
|
CONTENTS |
|
|
DESCRIPTION |
UNITS |
|
EWP®115 (Alloy) 12V |
1 |
|
Technical Specifications |
|
|
Voltage |
12 Volt Pump |
|
Operating voltage |
3V DC to 15V DC |
|
Maximum current |
10A @ 13V |
|
Flow rate (max) |
139 l/min |
|
Operating temp. |
-40° to 120°C |
|
Pump design |
Clockwise centrifugal with volute chamber |
|
Pump weight |
920 grams (2.03 lb) |
|
Pump material |
Aluminium |
|
Burst pressure |
500 kPa (72.5 psi) |
|
Seal |
Ceramic face seal |
|
Self Priming |
No, none of our pumps are self-priming |
|
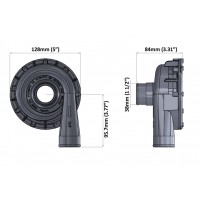
Fits hose sizes |
35mm to 51mm (1⅜” to 2”) Inlet: -16AN (12) Outlet: -16AN (12) |
|
Push-On fitting Size |
EWP Inlet & Outlet 38mm
|
EWP & CONTROLLER INSTALLATION DEMONSTRATION
Combined with an LCD EWP®/Fan Digital Controller (Sold separately Part #8002 or EWP® Combo Pack) will manage both the EWP® and Thermatic® fan operation. The Digital Controller will vary the speed of the EWP® in response to the engine’s coolant temperature. Multiple temperature settings are provided on the Controller for either maximum power or fuel efficiency. The Thermatic® Fan/s will be activated automatically once the engine coolant rises 3°C (5.4°F) above the targeted (set) temperature. The Digital Controller will automatically run on for three minutes (or to 10°C / 14°F below the set temperature) after engine shut down, eliminating ‘heat soak’ and extending engine life. The EWP® Controller Combo Pack is supplied in a do-it-yourself kit with everything you need for fitment to your vehicle’s engine, including an easy-to-follow DIY instruction booklet.
The world’s most advanced total engine cooling management system:
 universal fit
more power
more cooling
increase fuel efficiency
extend engine life
world-leading technology
EWP® INSTALLATION OPTIONS
Installing an EWP® as an AUXILIARY PUMP
EWP® INSTALLATION – disabling Mechanical water pump
In both these cases, the EWP® will pump past the impeller of the mechanical water pump.
Disengaged mechanical water pump (recommended)
Removed mechanical water pump (Ideal)
In most cases EWP® will be adequately supported by the radiator hose. Where mounting is required, the EWP® must be soft mounted to protect against vibration. For the EWP®115, EWP®140 and EWP®150 Part #8700 or #8710 Mounting bracket is recommended.
| PRODUCT SELECTION GUIDE Electric Water Pump (EWP®) |
|||||||
| APPLICATION |
PUMP MODEL |
PUMP ONLY | PUMP KIT | PUMP COMBO | |||
| 12V | 24V | 12V | 24V | 12V | 24V | ||
| Engines up to 2.0L (Standard) |
EWP®80 | #8105 Nylon #8106 Flange #8109 Barb |
N/A | #8005 Nylon #8006 Flange #8009 Barb |
N/A | #8907 Nylon #8908 Flange #8919 Barb |
N/A |
| Engines up to 2.0L - 3.5L (Standard) |
EWP®115 | #8125 Nylon #8140 Alloy |
#8126 Nylon #8141 Alloy |
#8025 Nylon #8040 Alloy |
N/A | #8930 Nylon #8950 Alloy |
N/A |
| Engines up to 3.5L - 5.0L (Standard) |
EWP®140 | #8180 Alloy | #8181 Alloy | #8080 Alloy | N/A | #8990 Alloy | N/A |
| Engines 5.0L or greater (Standard) Modified Engines Supercharged/Turbo, Drag Racing, 4WD, Off Road, Drifting & Speedway |
EWP®150 | #8160 Sliver #8165 Black |
#8161 Silver | #8060 Silver #8065 Black |
#8061 Silver | #8970 Silver #8975 Black |
#8971 Silver |
| Intercooler (depending on capacity) |
EWP®115 | #8125 Nylon #8140 Alloy |
#8126 Nylon #8141 Alloy |
#8025 Nylon #8040 Alloy |
N/A | #8930 Nylon #8950 Alloy |
N/A |
| EWP®140 | #8180 Alloy | #8181 Alloy | #8080 Alloy | N/A | #8990 Alloy | N/A | |
| EWP®150 | #8160 Sliver #8165 Black |
#8161 Silver | #8060 Silver #8065 Black |
#8061 Silver | #8970 Silver #8975 Black |
#8971 Silver | |
For further information, see Product Information


